

When it comes to restoring salvage car exteriors, selecting the right paint tools can significantly impact the quality of your repair work. A well-executed paint job not only enhances the vehicle’s aesthetic appeal but also helps protect the bodywork from further damage. Investing in high-quality paint tools ensures a smoother, more efficient restoration process.
One of the primary tools in any car restoration enthusiast’s arsenal is the paint gun. This essential tool allows for even application of paint, reducing the likelihood of runs and uneven surfaces. Different types of paint guns, such as HVLP (High Volume Low Pressure) or airless models, cater to various needs and preferences, making it crucial to choose one that complements your specific project.
In addition to the paint gun, other vital tools include spray masks, sanding blocks, and paint solvent. Each of these items plays a significant role in the repair process, contributing to a polished finish. Understanding the functions of each tool and how they work together will help you achieve the best results when restoring your salvage car exterior.
Choosing the Right Paint Gun for Professional Results
Selecting the right paint gun is essential for achieving high-quality results when restoring salvage car exteriors. A suitable spray gun can significantly impact the finish and durability of the paint job. There are a few critical factors to consider when making your choice.
First, evaluate the type of paint you will be using. Different paint materials, such as solvent-based, water-based, or specialty coatings, require specific paint guns designed to handle their unique properties. Ensure that the gun is compatible with your chosen product to avoid issues during application.
Next, consider the gun’s design. There are several types of paint guns available, including siphon feed, gravity feed, and pressure feed. Gravity feed guns are popular for automotive applications because they facilitate greater control over paint flow and atomization, leading to a smoother finish on the body of the vehicle.
The size of the nozzle also plays a significant role in paint application. A larger nozzle is best for thicker paints or primers, while a smaller nozzle can provide better atomization for thinner materials. Choose a nozzle size that aligns with the materials you plan to use on your repairs.
Additionally, take into account the air pressure requirements of the paint gun. Different models operate at varying levels of pressure, which can affect the spray pattern and consistency of the application. For professional results, selecting a gun that operates within a suitable range for the intended paint is crucial.
Finally, prioritize ergonomics and ease of use. A paint gun that feels comfortable in your hand will allow for more precise control, especially during detailed work on body panels. Look for features such as adjustable triggers and lightweight constructions to enhance your painting experience.
By carefully considering these factors, you will be able to choose the right paint gun that delivers professional results, ensuring your salvage car restoration project is a success.
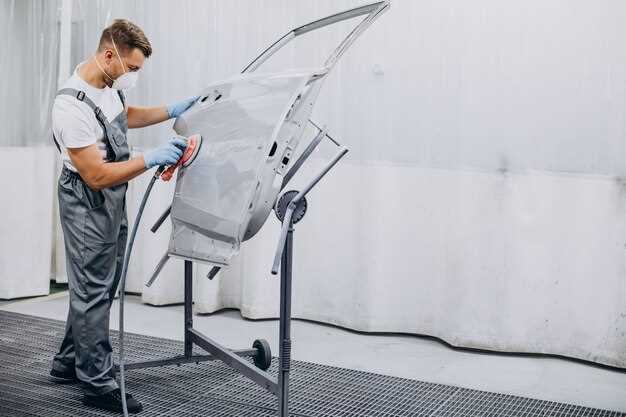
Essential Body Repair Tools for a Flawless Finish
Achieving a pristine finish during car restoration requires the right set of body repair tools. A high-quality paint gun is crucial for applying a smooth and even coat. Opt for an HVLP (High Volume Low Pressure) spray gun, as it reduces overspray and improves paint application efficiency. Proper setup and technique with the paint gun significantly impact the final appearance of the vehicle.
In addition to a reliable paint gun, a sanding block is necessary for surface preparation. It ensures that the surface is even and ready for paint application, helping to eliminate imperfections. Various grits of sandpaper should be used to smooth surfaces gradually, starting with a coarse grit and moving to finer options for a polished finish.
Unlike traditional brushes, the use of a paint roller can be beneficial for larger flat areas on the car’s body. When paired with a microfiber roller cover, you can achieve an even distribution of paint without noticeable brush strokes, which is essential for a flawless outcome.
Another vital tool is a detailing kit that includes assorted scrapers and fill tools. These allow you to handle dents and scratches effectively before painting. Properly repairing the bodywork with filler compounds and ensuring they are sanded down meticulously will lead to a surface that enhances the overall aesthetics post-painting.
Finally, invest in a quality masking tape and paper to protect areas that should not be painted. This step is critical in preventing overspray and ensuring sharp lines between different color finishes. By combining these essential tools and techniques, you will achieve a professional-quality exterior restoration on your salvage car.
Step-by-Step Guide to Preparing Car Surfaces for Painting
Preparing a car’s surface for painting is a critical step in ensuring a smooth, long-lasting finish. Here’s a detailed guide to help you achieve a professional result.
-
Assess the Car’s Condition
Begin by closely inspecting the body for any damage, rust, or imperfections that need repair. Look out for:
- dents
- scratches
- rust spots
- previous paint runs or imperfections
-
Clean the Car Surface
Thoroughly wash the exterior to remove dirt, grime, and oily deposits. Use:
- soap specifically designed for automobiles
- clean water and a soft sponge
After washing, rinse and dry the vehicle completely to avoid any residue.
-
Repair Damages to the Body
Address any imperfections identified in the first step:
- For dents, use a dent repair kit or seek professional help.
- For scratches or rust, sand down the affected areas until smooth, then apply body filler as needed.
- Allow any fillers to cure according to the manufacturer’s instructions before proceeding.
-
Sanding the Surface
Once repairs are complete, sand the entire area that will be painted:
- Use fine-grit sandpaper (around 400-grit) for a smooth finish.
- Sand in a circular motion and ensure the surface is even.
- Avoid over-sanding, which can damage the car’s body.
After sanding, clean the dust off the surface with a damp cloth.
-
Mask Off Areas
Protect parts of the car that should not be painted by using masking tape and paper:
- windows
- trim
- wheels and tires
- any areas that require a clean paint line
-
Final Cleaning and Surface Preparation
Before applying paint, do a final wipe down:
- Use a tack cloth to remove any remaining dust and contaminants.
- Ensure the car is in a well-ventilated area, free from dust and debris.
Following these steps will prepare your car surfaces correctly, setting the foundation for an outstanding paint job.